


Fold and cut
In this unit ākonga explore line or reflective symmetry and the names and attributes of two-dimensional mathematical shapes. They fold and cut out shapes to make shapes that have line symmetry.
About this resource
Specific learning outcomes:
- Explain in their own language what line symmetry is.
- Describe the process of making shapes with line symmetry.
- Name common two-dimensional mathematical shapes.
- Describe the differences between common two-dimensional mathematical shapes in relation to number of sides.
Fold and cut
Achievement objectives
GM2-3: Sort objects by their spatial features, with justification.
GM2-7: Predict and communicate the results of translations, reflections, and rotations on plane shapes.
Description of mathematics
A shape that can be folded down a line to produce two matching halves is said to have line symmetry or reflective symmetry. The fold-line is called a line of symmetry. A line of symmetry can also be described as a mirror line or line of reflection because the part of the object that is on one side of the line is reflected onto the other side of the line.

The goal at this level is to support ākonga to independently describe reflective symmetry in their own language and demonstrate understanding of this concept. This creates a foundation on which to build a more complex understanding of symmetry at higher levels of the curriculum, e.g., the order of reflective symmetry and rotational symmetry.
Learning the names and attributes of common two-dimensional mathematical shapes is important and necessary as ākonga develops a geometry vocabulary. The following are common two-dimensional mathematical shapes and their attributes that could be introduced in this unit. Not all these shapes need to be presented to all ākonga. Teachers need to select the ones appropriate based on the readiness of ākonga.
- Polygon - a shape with straight line sides
- Triangle - a shape with three straight sides
- Equilateral triangle - all sides are the same length, and all angles are 60°.
- Right angle triangle - one inside angle is a right angle, 90°.
- Isosceles triangle - two sides are the same length, and two angles are the same.
- Scalene triangle - all sides are different lengths, all angles are different.
- Quadrilateral - a shape with four straight sides
- Square - a shape with four sides all the same length and all angles 90°
- Rectangle - a shape with two pairs of parallel sides, all angles 90°
- Trapezium - a shape with four sides, including one pair of parallel sides
- Rhombus - a shape with four sides all the same length; angles may or may not be right angles.
- Parallelogram - a shape with two pairs of parallel sides, angles may or may not be right angles.
- Pentagon - a shape with five straight sides
- Hexagon - a shape with six straight sides
- Octagon - a shape with eight straight sides
Note that pentagons, hexagons, and octagons are any shapes with 5, 6, or 8 straight sides. The length of the sides does not need to be the same, nor do the angles need to be the same.
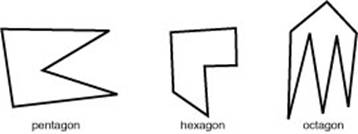
Pentagons, hexagons, and octagons with sides the same length and angles the same are called regular pentagons, regular hexagons, and regular octagons. A square is a regular quadrilateral, and an equilateral triangle is a regular triangle.
Opportunities for adaptation and differentiation
This unit can be differentiated by varying the scaffolding of the tasks or altering the difficulty of the tasks to make the learning opportunities accessible to a range of learners. For example:
- providing templates that ākonga can use to create symmetrical shapes
- providing attribute shape blocks for ākonga to explore different shapes
- supplying mirrors for ākonga to use when thinking about how particular shapes can be made by folding and cutting
- providing tracing paper or baking paper for ākonga to use
- providing opportunities for ākonga to work collaboratively (mahi tahi) with peers with different levels of mathematical knowledge (tuakana-teina) to make a combined scene using the symmetrical shapes they have constructed.
- providing ākonga with a list or display of the names and attributes of relevant shapes that they can refer back to throughout this unit of learning. This could be created collaboratively with the class.
The context in this unit can be adapted to recognise diversity and student interests to encourage engagement. Ākonga can identify familiar and natural objects with line symmetry, such as skateboards, swimming goggles, running shoes, pipi or other shells, flowers, maunga reflection on an awa, leaves, butterflies, logos, kōwhaiwhai patterns, or other cultural motifs.
Te reo Māori vocabulary terms such as āhua (shape), whakaata (reflect/reflection), and hangarite (symmetry/symmetrical) could be introduced in this unit and used throughout other mathematical learning.
Required resource materials
- Paper
- Scissors
- Rulers
- Pencils
- Attribute shape blocks and tracing paper/baking paper (for adaptation and differentiation)
Activity
As ākonga work through these activities, the teacher may need to bring the class or small groups of ākonga together from time to time to discuss and model. Make sure an understanding of what line symmetry is and the names and attributes of common two-dimensional mathematical shapes is developing, along with appropriate vocabulary.
Teachers may also like to generate a class display of the names and attributes of the shapes to be used over the course of the unit.
1.
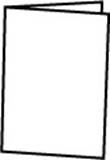
Take a square piece of paper and fold it in half in front of the class.
2.
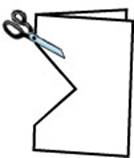
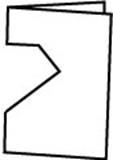
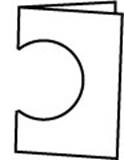
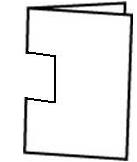
Using scissors cut out the shape as shown below. Before opening the paper ask the class:
- Will the other half be exactly the same?
- How do you know the other half will be exactly the same?
- When I open this piece of paper, what shape will the hole in the middle be?
3.
Open the paper and open up the piece that was cut out. Talk about the attributes of the shape.
4.
Repeat this process cutting out the following shapes.
5.
Discuss the shapes when the paper was folded in half and when it was unfolded. The aim of this discussion is to find out what ākonga know and notice. Questions like the following could be used:
- Why did it work like that?
- How many sides and how many angles?
- What do you notice about the length of the sides?
- Are any angles the same?
- Does anyone know the name of this shape?
6.
Challenge ākonga:
- What other shapes could be made by folding a square piece of paper in half and cutting?
- What shapes do you think are impossible to make?
7.
Hand out square pieces of paper and get the class to experiment and try to make some new shapes. Some ākonga could record their thinking about the relative attributes that go with the shapes they make. Some ākonga may need shape blocks available to try to replicate with folding and cutting.
- How many different straight line shapes can be made by folding a square piece of paper in half and cutting?
For most of this unit the focus is on straight line shapes. Using a ruler to draw the straight lines onto the folded paper before cutting is encouraged. Working in small groups, the ākonga are to make as many of the following as they can. A tuakana/teina model could work well here.
Make . . .
- 4 different looking shapes with 3 straight sides
- 4 different looking shapes with 4 straight sides
- 4 different looking shapes with more than 4 straight sides
Place these shapes into three piles.
1.
Shapes with 3 straight sides
2.
Shapes with 4 straight sides
3.
Shapes with more than 4 straight sides
Once as many different shapes as possible have been made, assign a category of shapes to pairs of ākonga, e.g. shapes with 3 straight sides. The pairs sort their shapes according to the way they look. A tuakana/teina model could work well here. The ākonga then share with the rest of the class why they sorted their shapes as they did. Ākonga could use known shapes or reference posters to help with this.
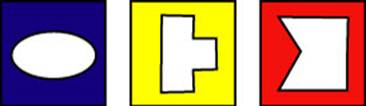
- How many of the following shapes can you make by folding and cutting?
Ask ākonga to fold a square piece of paper in half and cut out a shape so that when they unfold it the hole will be one of the shapes below.
Model doing one shape in front of everyone. Emphasise that you are looking for a line in the shape that you could fold on, so both halves would be the same (this is called a line of symmetry or reflective symmetry).
Get the ākonga to predict which shapes will be the easiest to make, the hardest to make and whether any will be impossible. Ask why they think they will be easy, hard or impossible.


Make some more challenges like the ones above for others in your class. You could provide photographs of things in nature that have lines of symmetry that ākonga could replicate. Search 'reflective symmetry' in a google image search for some ideas.
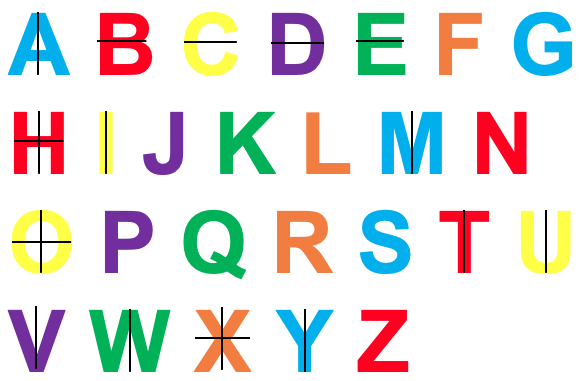
- Make as many letters of the alphabet as you can by folding and cutting.
This activity could also be adapted to use two-dimensional shapes that are relevant to your current context of learning (e.g. the shape of a marae, a koru, and the shape of a wave; sports gear). Some ākonga may benefit from working in pairs, and/or with the teacher in this session - at least initially.
As a reference point, here are the alphabet letters that do and do not have lines of symmetry.
Ask ākonga (mahi tahi model) to think about the things they have learnt this week, the names of shapes and about their reflective or line symmetry.
Give pairs of ākonga 3-4 of the shapes from the list below that ākonga have become familiar with while completing this unit. Ask them to describe them using their own words and the words they have been learning this week. Also ask them to identify which shapes have line or reflective symmetry. A tuakana/teina model could work well here.
Equilateral triangle, Right angle triangle, Isosceles triangle, Scalene triangle, Square, Rectangle, Trapezium, Rhombus, Parallelogram, regular and non regular Pentagon, Hexagon and Octagon.
Home link
Dear family and whānau,
We have been exploring different shapes in class this week, focusing on ones that have reflective symmetry, that is shapes that can be folded in half so both halves are the same. It would be appreciated if you could support your child to look for objects and shapes around your home that have reflective or line symmetry. They could make a list of the objects and draw a picture showing how the object could be 'folded'. Furniture, art, cutlery, plates, electronic items, things in the garden, and other items around the home could have reflective symmetry.
Related resources
Figure it Out links
A link from the Figure It Out series which you may find useful is:
- Link, Years 7-8, Algebra, Geometry and Measurement, Punch a Pattern, page 2.
The quality of the images on this page may vary depending on the device you are using.